Your vehicle’s battery and alternator work in tandem to supply power to operate lights and other electrical components. The voltage supplied to the battery by the alternator should be 13.5 to 14.4 volts if it’s working properly. Any less means you have a problem.
There are two types of alternator drives: serpentine (the most commonly used today) and V-belt. V-belt drives use multiple belts and require prying on each accessory to adjust the tension. Meanwhile, most serpentine belts use a single spring-loaded auto-adjusting tensioner.
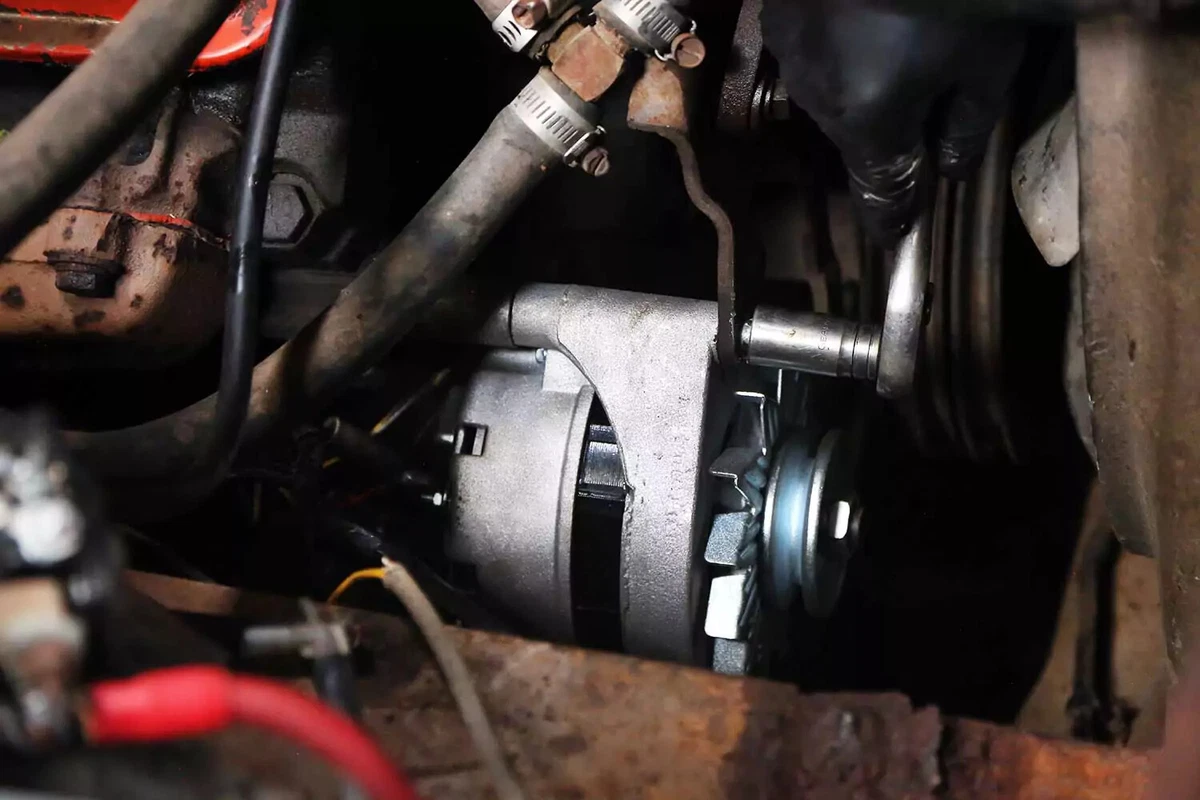
For our demo vehicle, the alternator is driven by a V-belt and is externally regulated. We’ll demonstrate repairing a V-belt configuration and older externally regulated wiring. It’s more complicated to replace compared to modern one-wire or plug-in alternators.
Tips and Tricks:
- Alternator fitments are tricky. The same vehicle can use one of several part numbers depending on the accessories and the market where it was sold. (For example, Alaska-bound vehicles might get a heavier-duty alternator due to sub-zero temperatures.) Research and confirm a match before you order a new one.
- In most cases, the alternator will fail with little warning. Frequent no-crank start attempts due to a dead battery can be a sign of either a failing alternator or a failing battery.
- A dying battery can kill your alternator, and a failing alternator can kill your battery, so the two often go hand in hand.
- If your battery is undercharged, put it on a charger while changing the alternator. Everyone should have a battery charger. A six-amp model has enough power to charge a dead battery overnight.
- Take a close look at the belt, tensioner, and idler pulleys. If they look worn or damaged, replace them with new ones.
- Most vehicles have alternators with one large wire and one or two control terminal plugs that clip into the regulator. These plugs usually have one to four wires. The large wire sends current to the battery and the rest of the vehicle, while the other wires control the alternator’s voltage output.
- Older vehicles built before the mid-1970s—like our demo vehicle—have externally regulated alternators with multiple wiring lugs on the back.

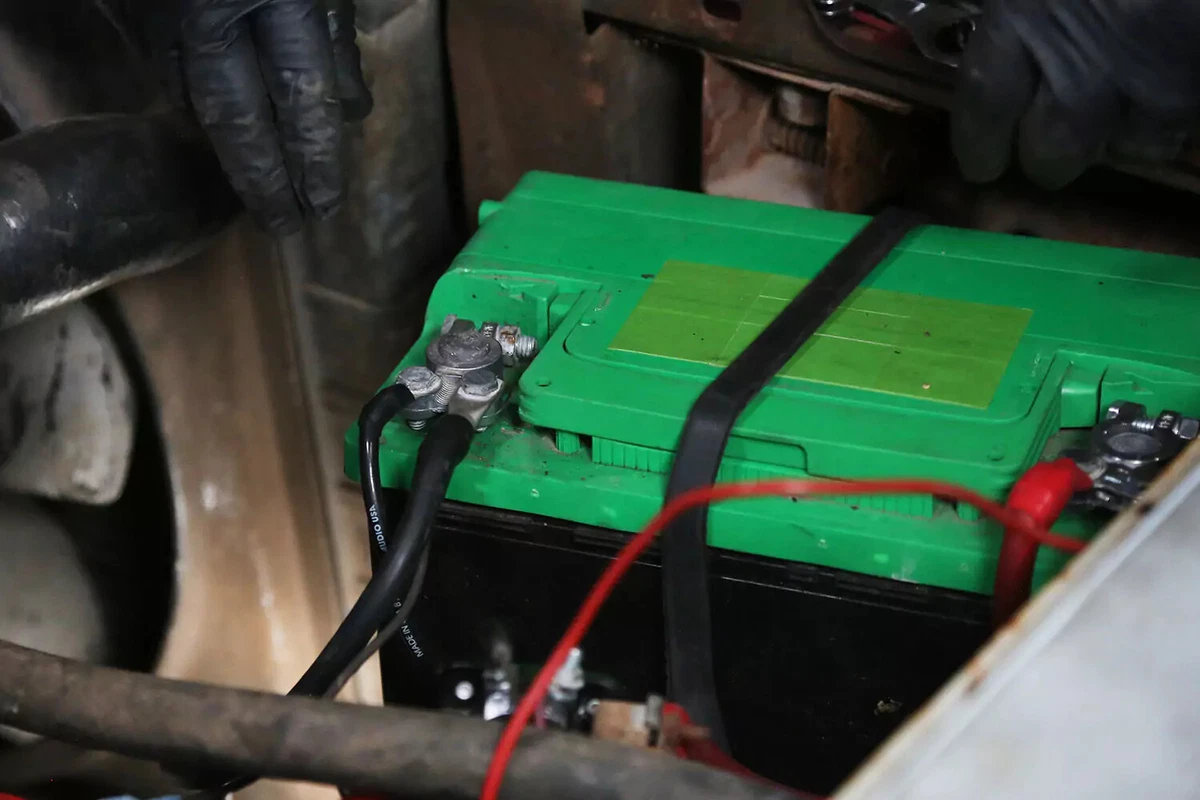
The first step for many auto repair jobs is to disconnect the battery from the vehicle. It’s a simple task. Remove the ground clamp from the battery’s negative post. Plus (+) and minus (-) signs are usually molded into the plastic battery case near the post.
Removing the negative terminal first ensures the vehicle is no longer connected to a live battery, preventing sparks or electrical shorts.
Pull the terminal off the battery for a close inspection. If there is corrosion, loose wires, or physical damage, consider replacing the battery terminal or cable.
Move the terminal away from the battery into a position where it can’t accidentally touch the battery post.
Nearly all alternators look like the one shown here. The case is usually aluminum, and the copper windings are visible. There are also lots of venting holes. The rule is to follow the belt.
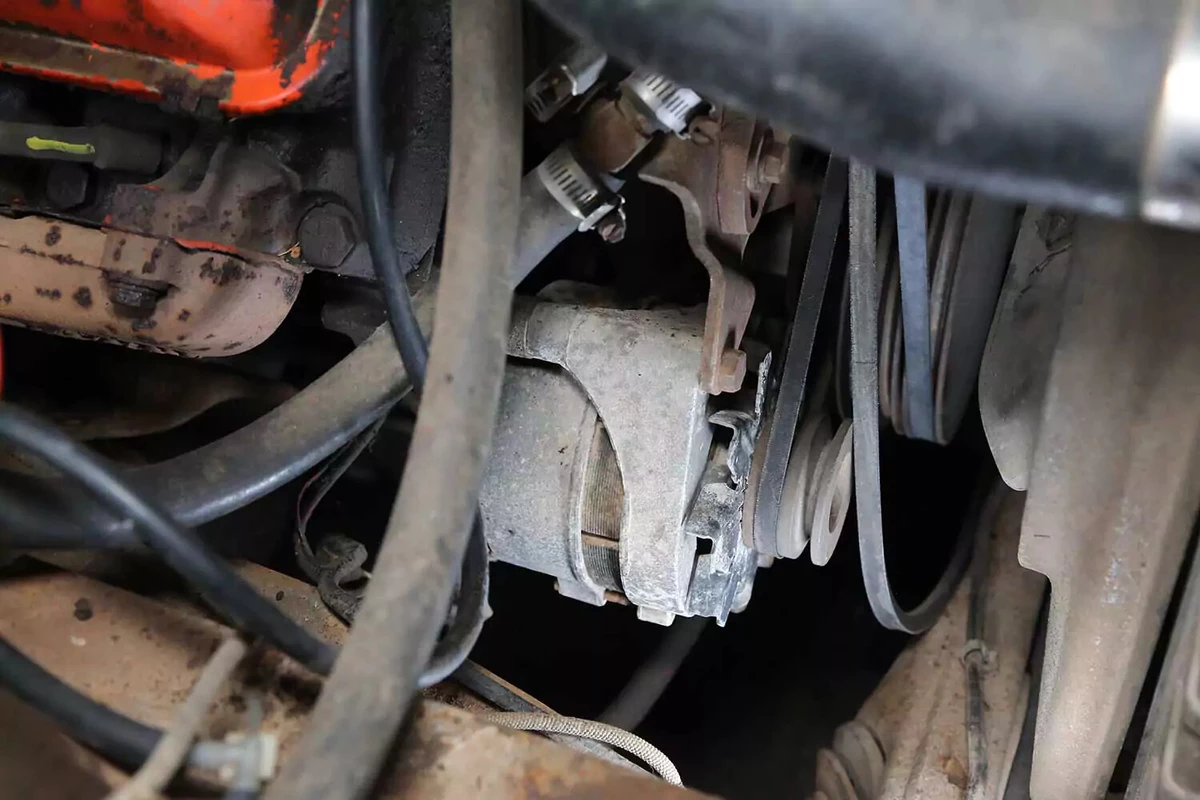
Our demo vehicle’s alternator is located on the lower passenger side of the engine, next to the engine block.
In our demo vehicle, a heater hose is routed tightly behind the alternator, making it difficult to reach the wires. In some vehicles, you must remove hoses, brackets, panels, air tubes/boxes, or suspension components to access the alternator.
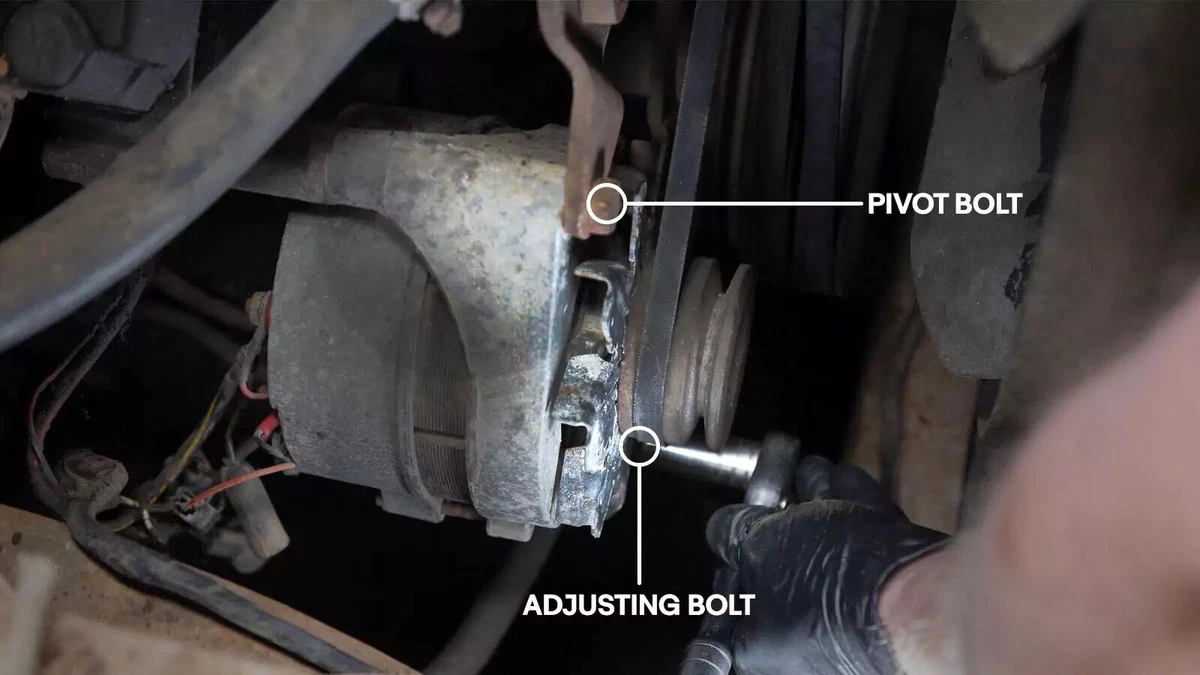
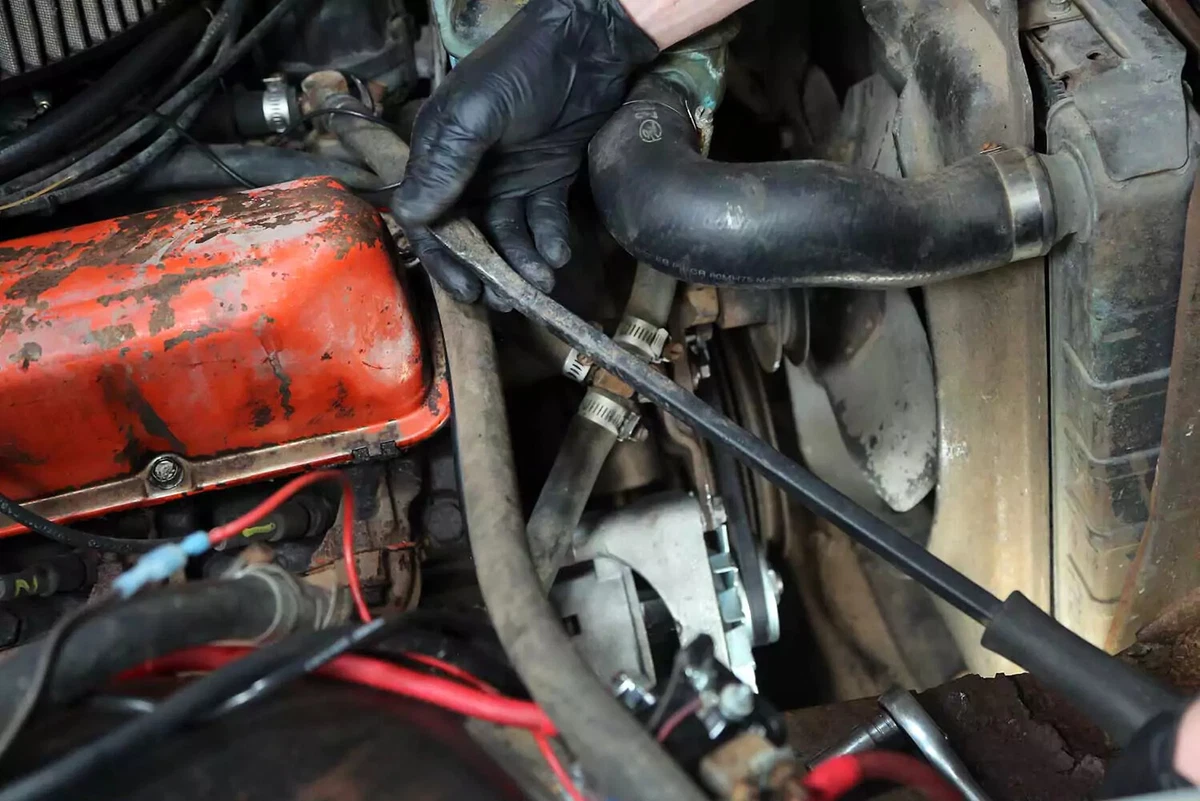
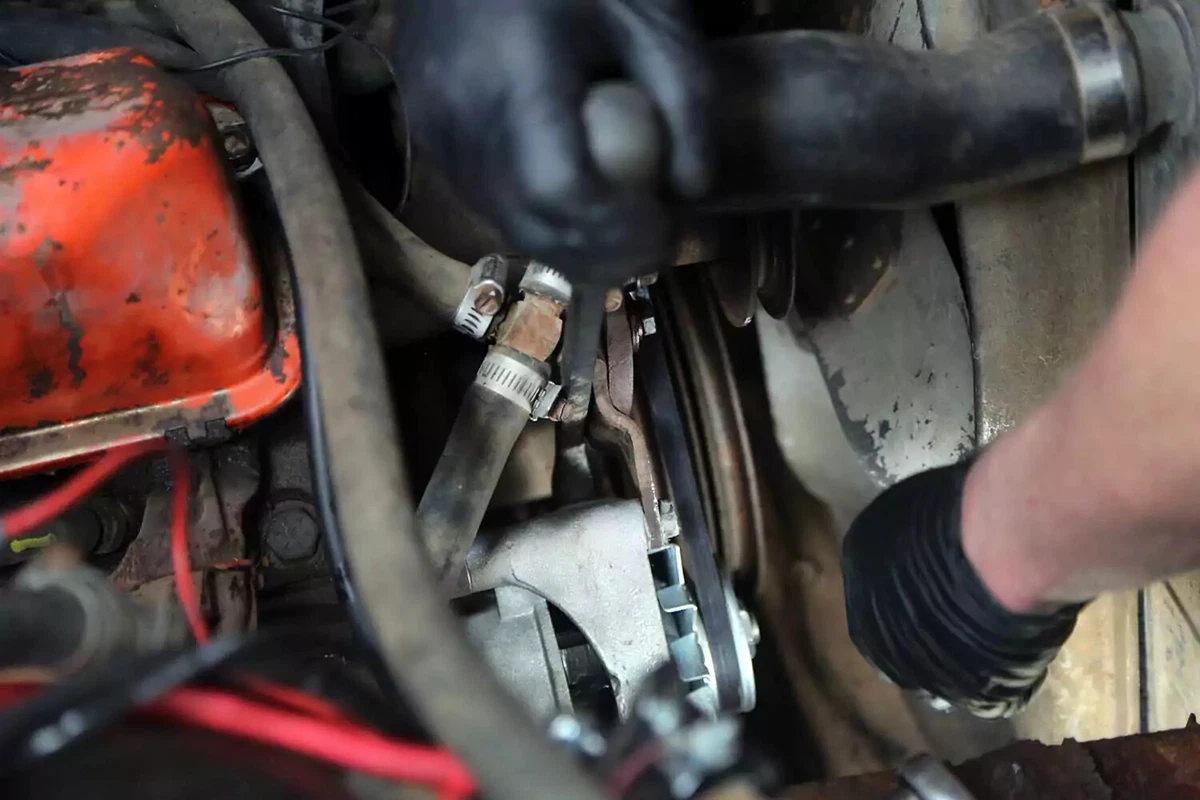
Release the tension on the alternator’s adjusting bolt. V-belt drives have a slotted arm and pivot point for the accessory to rotate in and out to tighten the belts. To remove the belts, loosen (but don’t remove) the sliding bolt and the pivot bolt.
If you’re replacing the old belt, you may need to remove other accessory drive belts to access the alternator belt.
If your vehicle has a serpentine belt, use a breaker bar or ratchet to relieve the belt tension and remove the belt from the alternator pulley. The tensioner arm’s casting usually has a square hole that accepts a ratchet or breaker bar.
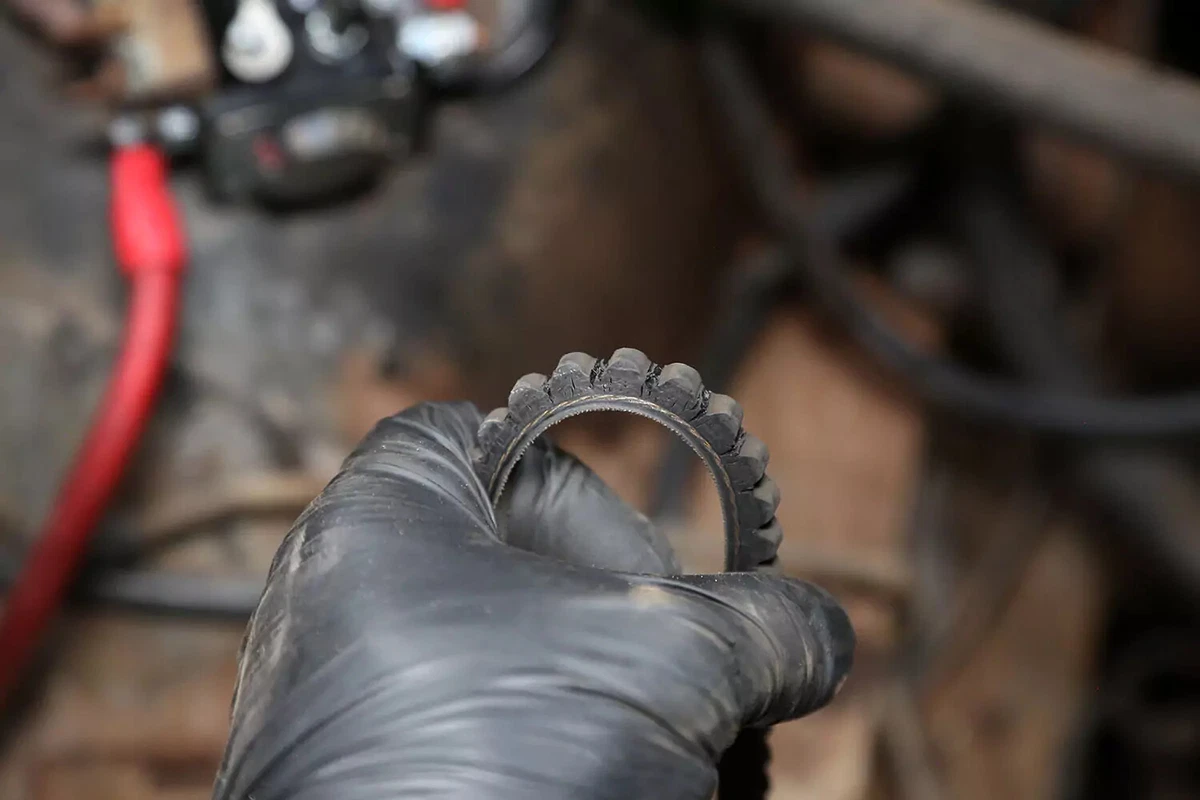
Check your belts for wear. This is a great time to replace them. Notice the cracks in the grooves on this V-belt, which is near the end of its life. For serpentine belts, look for worn edges, frays, and cracks in the grooves.

Internally-regulated alternators only have two connections. Disconnect these alternators from the wiring harness before removal.
Externally regulated alternators are often more difficult to wire, so they are sometimes removed from their brackets before the wiring is disconnected.
Alternators typically have two bolts holding them to the brackets. Remove these bolts.
- For serpentine belt drives, remove both bolts and retain them for reuse.
- For V-belt drives, loosen the alternator bolt on the slotted arm (tension side). Then, remove the pivot bolt.
- Some brackets have spacers on one or both bolts, regardless of belt type. Retain these and the bolts for reuse. Inspect the bolts for damage and replace them as needed with grade 8 SAE (or 10.9 metric) bolts.
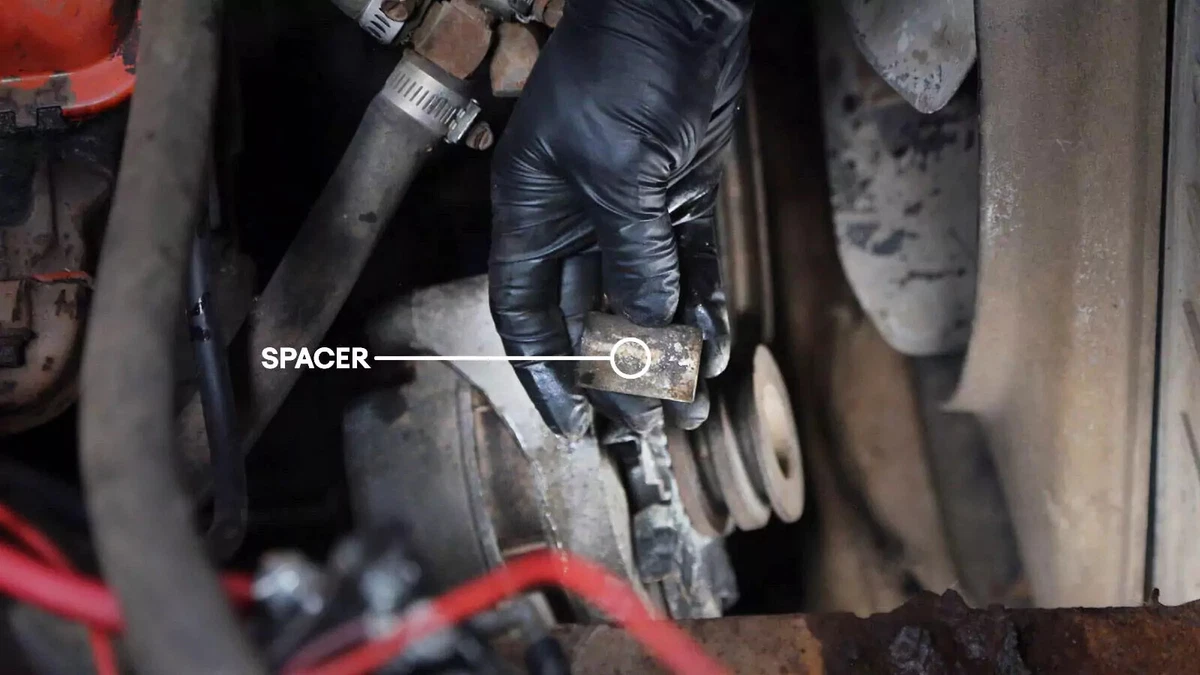
Remove the alternator from the bracket. Many engines use spacers in between the block/bracket and the alternator.
Engines also use press-fit bushings that clamp down on the case when the bolts are tightened. This keeps the case centered in position, preventing the bolts from stripping.
When the alternator has been in place for a long time, the steel bushings don’t easily release their grip on the aluminum casing. Use a pry bar or big flat-blade screwdriver to gently pry the alternator case out of the bracket.
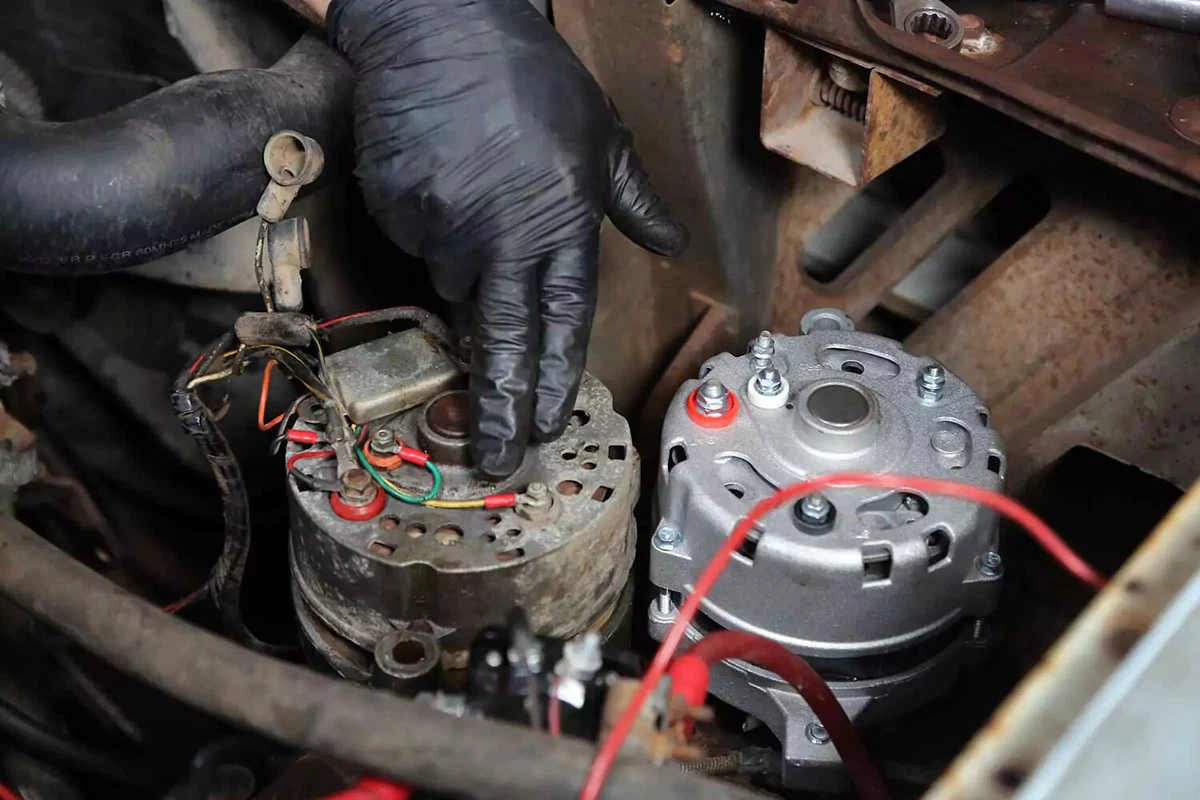
Compare the old and new alternators. You don’t want to begin installing the new one only to discover it’s different. The mounting points, wiring lugs, and sockets can vary by model.
- Look at the plug terminals to confirm they are the same size and shape.
- They should also share the number and location of electrical pins in the connectors.
- Check the output lug for placement and size. Verify the mounting holes are in the same location.
- If the control plug terminal is in a slightly different place, that’s usually okay—if you have enough wire to reach the new location.
Our new alternator was slightly different from the old one. But the harness was long enough to accommodate the minor difference.
Occasionally, you’ll need to swap the pulley from the old part to the new one. In that event, you’ll need an impact gun or large socket and ratchet. There’s no good way to prevent the alternator's armature shaft from turning when you unscrew that big nut holding the pulley. An air or electric impact gun will help. The new alternator will likely come out of the box equipped with a pulley.

Most modern serpentine-belt engines have press-fit bushings that tighten the alternator in place. (This is not required for most V-belt drives.)
If your engine has press-fit bushings, add some clearance after removing the alternator. A quick tap with a hammer should push them slightly back so the new alternator can slide between them.
These bushings are often hard to reach with a hammer or pry bar, so try this trick to reset them. Grab a bolt that fits the bracket (you can use the original bolt), a washer, a nut, and a spacer. Use a stack of washers if you don’t have a spacer that fits. Thread the bolt through the bracket with the nut, spacer, and washer, as shown. Leave the bolt a couple of threads shy of bottoming out. Now, you can thread the nut out a turn or two to push the bushing wider.
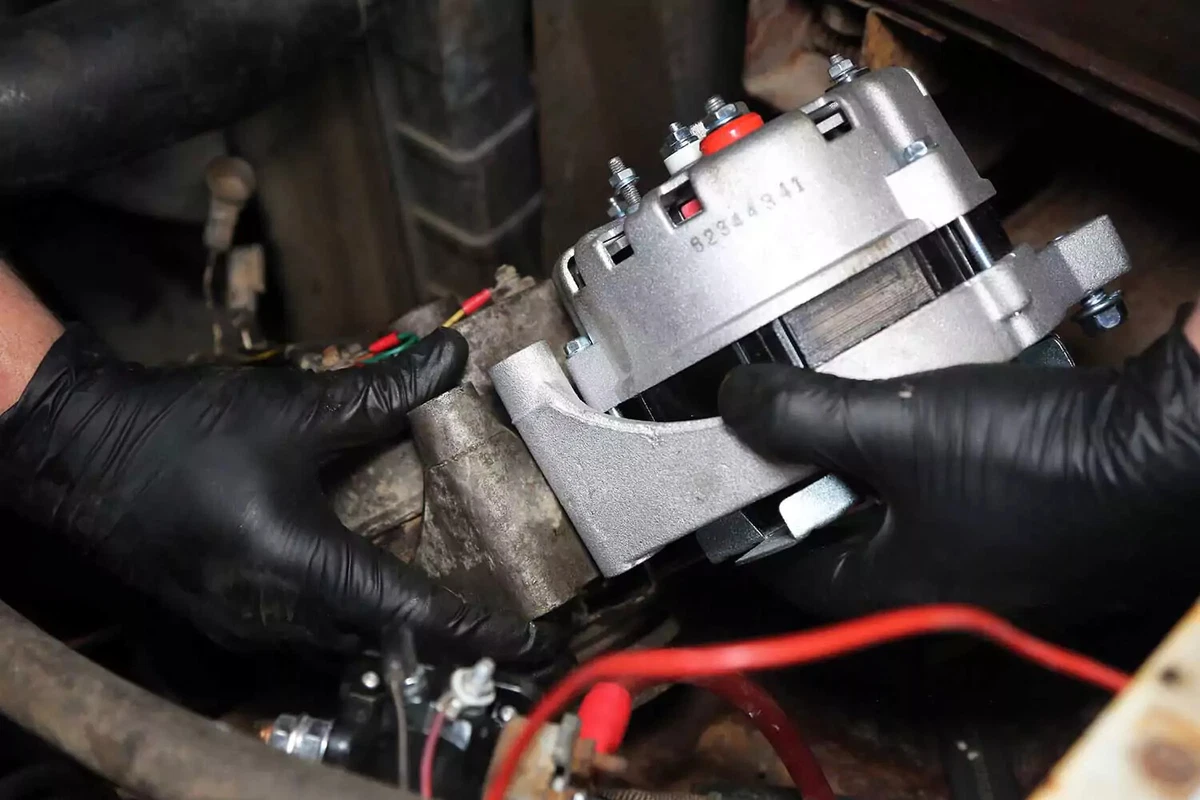
This pre-1970s alternator is externally regulated, requiring separate wire lugs for each connection—unlike modern alternators with one or two quick-connect plugs. We chose this vehicle to show the older style.
There are four terminal positions on this style of alternator:
- Stator (black isolator)
- Field (white isolator)
- Battery (red isolator)
- Ground (two non-insulated lug posts).
The original alternator had an aftermarket mini-regulator attached, which was reused because it’s in good working order. Otherwise, consider replacing the external regulator.
Take a photograph or two so you can reinstall the wires in the correct position later.

These two internally regulated alternators have simpler wiring. Instead of multiple wiring lugs, you have one plug and a main battery post. Some newer vehicles—from the 2010s and later—use pulse-width modulated (PWM) alternators, which have two plugs and a battery post.
PWM alternators are controlled directly by the engine’s computer. A voltage regulator is not required.
Compare the new and old alternators to verify that the wiring plugs are the same. Sometimes, the front and rear halves of the case are clocked differently than the original—so the plug might be in a different position. If so, the terminals could be rotated 90 or 180 degrees from your old alternator. Verify that the wiring plug will still fit.
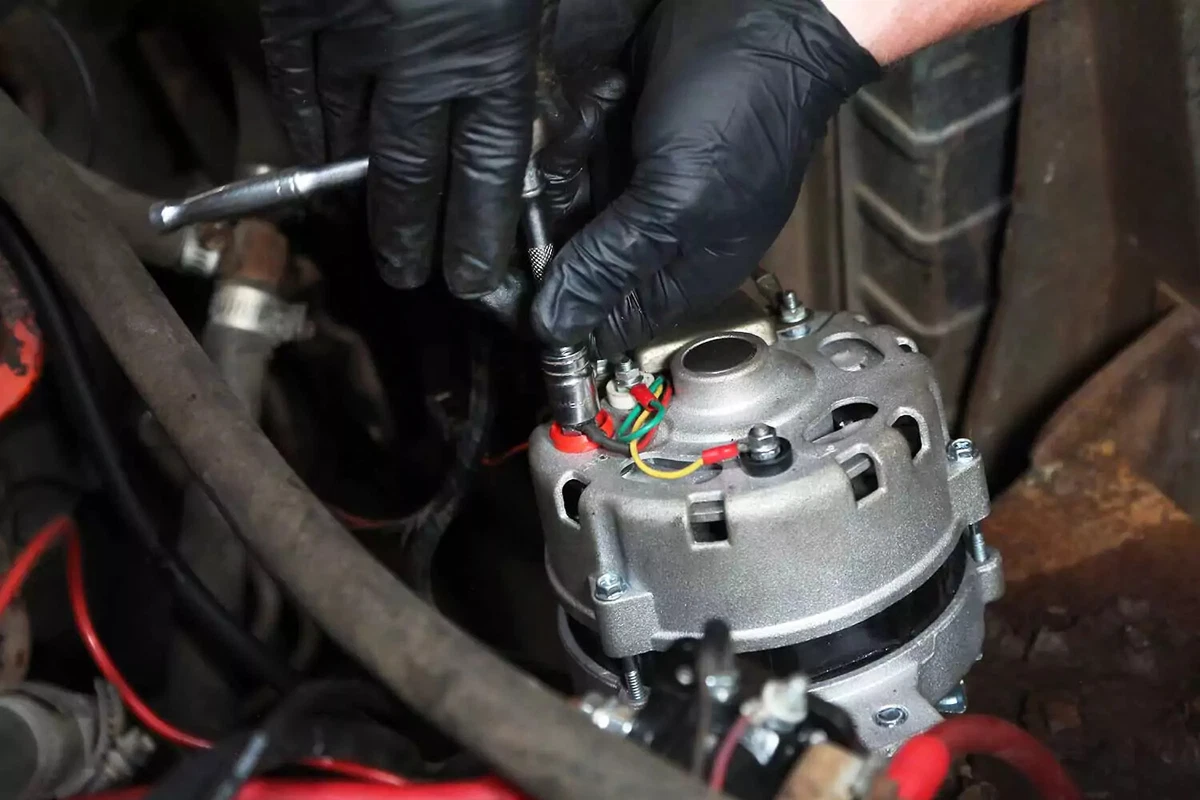
Move each wire from the old alternator to the new one. Do not overtighten the nuts, which can damage the alternator’s internal wiring.
Ensure each wire goes to the correct lug, one at a time. Don’t disconnect all the wires from the old alternator at once.
We advise completing this step, although it’s optional.
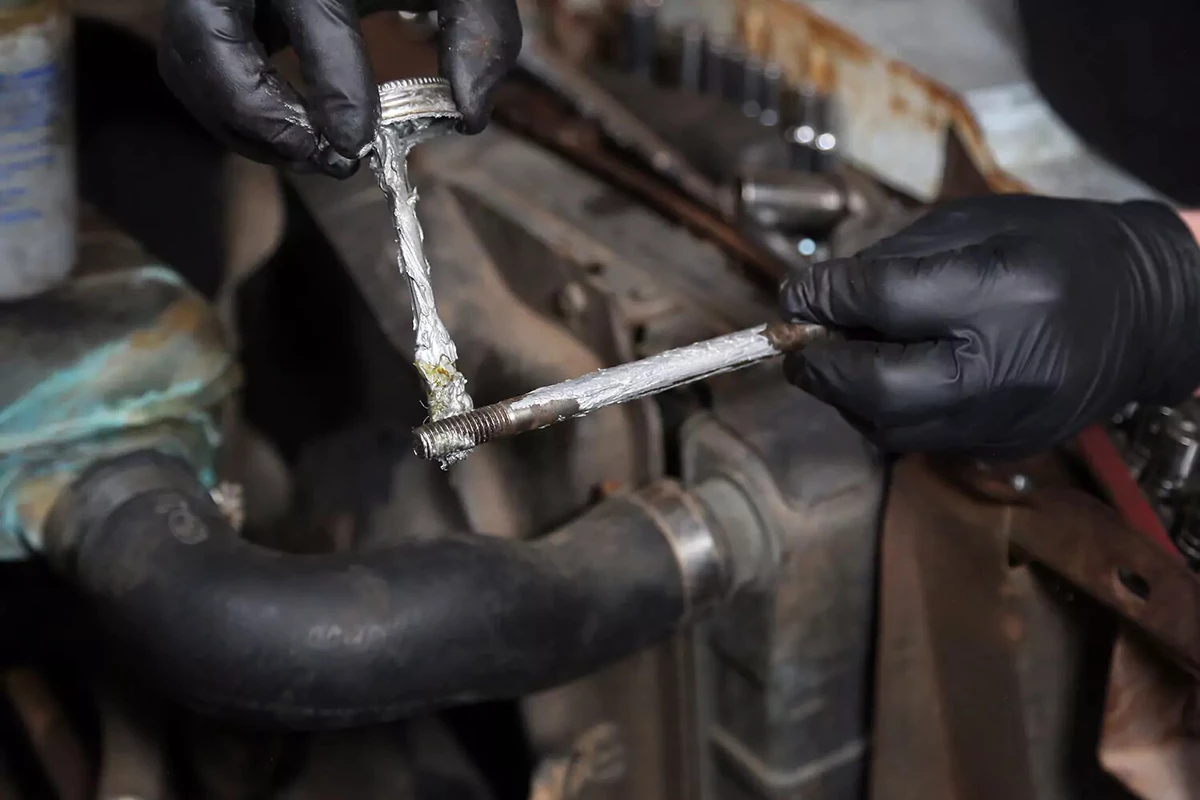
Alternator bolts are steel, but the alternator, brackets, and engine block are usually aluminum for most modern engines. These dissimilar metals can corrode and seize onto each other, making removal difficult. To prevent this, coat the bolts with a small amount of anti-seize compound to prevent corrosion. This will make the bolts easier to remove in the future.
Install the alternator into the engine brackets. Thread in the bolts. Use any spacers or washers that were previously removed.
For serpentine-belt drives, tighten the bolts to the manufacturer’s torque specs, typically 14 pound-feet. You should be able to tighten the bolts by hand with a ratchet or box wrench. Do not overtighten the bolts, which can strip the threads.
For V-belt drives, don’t tighten the bolts yet. Instead, snug them so the alternator can slide on the adjuster arm but not wiggle in the brackets.
Use a large pry bar to apply tension on the V-drive belts. Pry the alternator away from the engine while simultaneously tightening the adjustment bolt. Some drives use two belts on the alternator. You can do this alone, but it’s easier with two people: one to hold tension on the pry bar and one to tighten the bolts.
For serpentine-belt drives, use a breaker bar, ratchet, or ratchet and socket to release the tensioner and reinstall the belt. Your engine bay probably has a sticker with a diagram showing the belt routing.
- If it’s a ribbed pulley, the belt’s ribbed side wraps over the pulley.
- For smooth pulleys, the flat back of the belt contacts the pulley.
- A few belts have ribs on both sides. For the correct routing, consult the belt routing diagram under the vehicle’s hood or in the repair manual.
Release the tensioner.
For V-belt drives, install the belt on the pulleys. That’s typically the water pump and crank pulley. Then, use a pry bar to put tension on the belt. Be careful to place the pry bar against solid surfaces so it doesn’t slip or damage anything. Hold tension on the alternator as you tighten the bolt on the slider arm. Then, tighten the pivot bolt.
V-belts should have about a half-inch of vertical slack when properly tightened. The belt should flex the thickness of your thumb when correctly tightened. A belt that doesn’t flex has too much strain on the bearings and wears out faster.
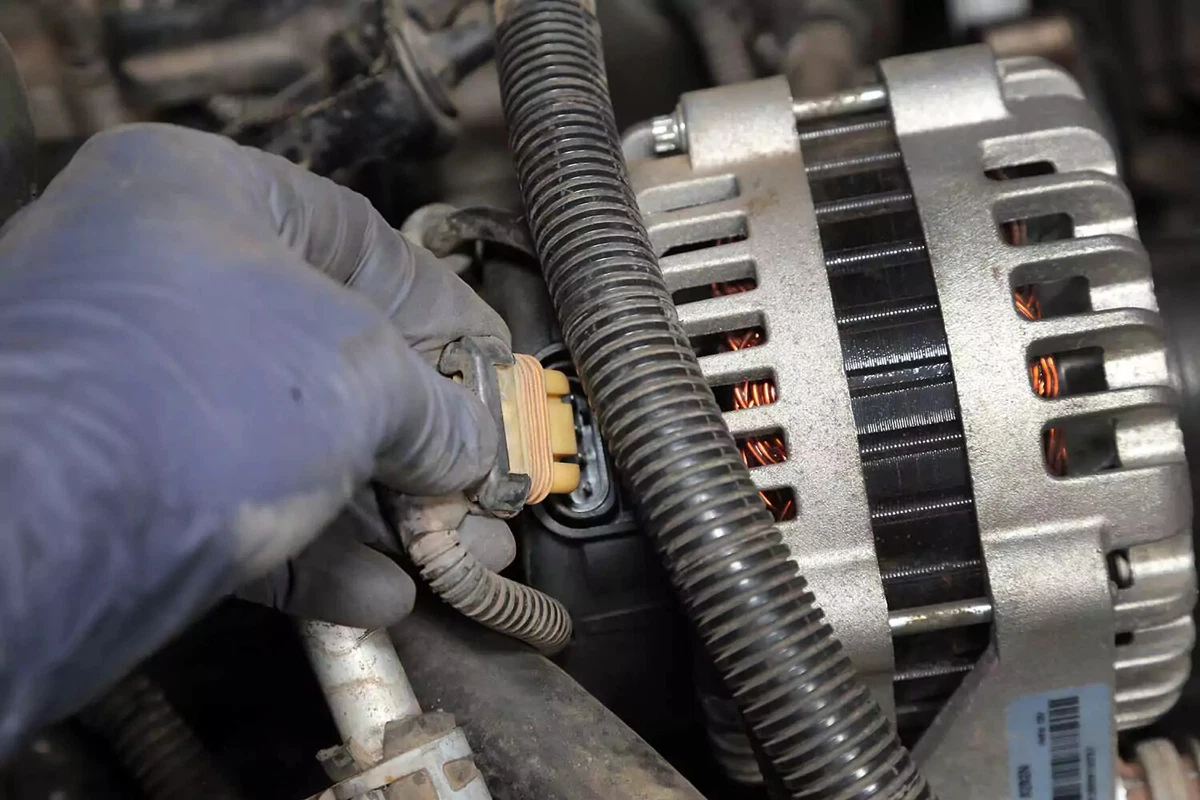
For internally regulated alternators, route the control terminal plug to the new alternator and plug it in. If equipped, lock the clip. Then, install the battery cable terminal lug.
Reconnect the battery’s negative terminal.
Your new alternator is now fully installed. Start the engine and verify the alternator is putting out the correct voltage.
To trigger the alternator’s circuitry, rev the engine to about 2,500 rpm for about 30 seconds. If you have a voltmeter on the dash, it should read about 14 volts. If you don’t have a gauge, you can check the battery voltage with a digital multimeter. The output should be between 13.5 and 14.4 when the engine is running. If not, you need to do more diagnostics to reconfirm that a bad alternator was the problem.
About the author

Share your feedback
This article is meant to provide general guidance only. Automotive maintenance, repair, upgrade, and installation may depend on vehicle-specifics such as make and model. Always consult your owner's manual, repair guide for specific information for your particular vehicle and consider a licensed auto-care professional's help as well, particularly for advance repairs.
Recommended for you
Find answers and inspiration
How to Change a Car Battery
6 min readAutomation How to Change a Car Battery
6 min readSBJ 1.2 Test Prod - Change a Car Battery Shari
6 min read
Distributors 101
6 min read
How to Replace Spark Plugs
7 min read
How to Replace an Ignition Coil
6 min read
How to Buy the Right Ignition Coils
7 min read
A Deep-Dive Guide to Ignition Wires
7 min read
How to Replace a Distributor Cap and Rotor
5 min read
Buying the Right Distributor Cap and Rotor
4 min read
When to Replace Your Car’s Battery
5 min read
How Do Ignition Coils Work?
5 min read
Ignition Wire Buying Guide
6 min read
How to Buy the Right Car Distributor
6 min read
All About Your Distributor Cap and Rotor
7 min read
What to Consider When Buying a Car Battery
6 min read
An Intro to Jump-Starting Your Car Battery

How to Jump Start a Car
9 min read
How to Choose the Best Spark Plugs
5 min read
Spark Plugs 101
7 min read
Explore more projects

How to Repair a Chipped Windshield
1 to 2 hours
Beginner
7 min read

How to Replace Brake Fluid
1 to 2 hours
Beginner
10 min read
How to Replace an Ignition Coil
Less than 30 minutes
Beginner
6 min read

How to Replace a Radiator Hose
Less than 30 minutes
Beginner
5 min read

How to Replace Brake Rotors
1 to 2 hours
Beginner
7 min read

How to Replace a Serpentine Belt Tensioner
Less than 30 minutes
Beginner
4 min read

How to Replace a Drive Belt
Less than 30 minutes
Beginner
5 min read

How to Rotate Your Tires
30 to 60 minutes
Beginner
5 min read

How to Refill Windshield Washer Fluid
Less than 30 minutes
Beginner
4 min read

How to Replace an Oxygen Sensor
30 to 60 minutes
Beginner
5 min read

How To Replace Differential Fluid
Less than 30 minutes
Beginner
8 min read

How to Replace Sway Bar End Links and Bushings
30 to 60 minutes
Beginner
6 min read

How to Replace Transmission Fluid and Filter
1 to 2 hours
Beginner
11 min read

How to Replace a Cabin Air Filter
Less than 30 minutes
Beginner
5 min read

How to Change Disc Brake Pads
30 to 60 minutes
Beginner
8 min read

How to Replace a Valve Cover Gasket
Less than 30 minutes
Beginner
7 min read

How to Change Windshield Wipers
Less than 30 minutes
Beginner
3 min read

How to Replace an Engine Air Filter
Less than 30 minutes
Beginner
5 min read

How to Clean Fuel Injectors
1 to 2 hours
Beginner
8 min read

How to Replace Shock Absorbers
30 to 60 minutes
Beginner
8 min read
How to Change a Car Battery
Less than 30 minutes
Beginner
6 min read
Automation How to Change a Car Battery
Less than 30 minutes
Beginner
6 min read

How to Replace a Mass Air Flow (MAF) Sensor
Less than 30 minutes
Beginner
7 min read

How to Replace a Clutch Master Cylinder
1 to 2 hours
Beginner
11 min read

How to Flush and Change Engine Coolant
30 to 60 minutes
Beginner
6 min read
How to Replace a Distributor Cap and Rotor
30 to 60 minutes
Beginner
5 min read

How to Check Tire Pressure and Change a Tire
Less than 30 minutes
Beginner
9 min read

How to Replace a Fuel Filter
30 to 60 minutes
Beginner
7 min read

How to Replace a PCV Valve
30 to 60 minutes
Beginner
6 min read

How to Replace a Brake Caliper
1 to 2 hours
Beginner
7 min read

How to Replace an Idler Pulley
30 to 60 minutes
Beginner
4 min read

How to Change a Headlight Bulb
Less than 30 minutes
Beginner
6 min read

How to Replace an Exhaust Gasket
1 to 2 hours
Beginner
9 min read

How to Replace a Throttle Body
30 to 60 minutes
Beginner
6 min read

How to Change Oil in a Car
Less than 30 minutes
Beginner
8 min read

How to Replace an EGR Valve
30 to 60 minutes
Beginner
5 min read
How to Jump Start a Car
Less than 30 minutes
Beginner
9 min read