
About
Reviews (3)
Mar 09, 2017
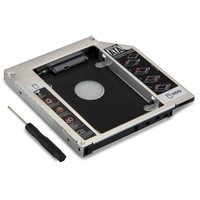
Great way to ramp up the disk capacity on your laptop
How many of us have got laptop with a DVD drive ? And how often do you actually use that DVD drive. I for one never use the DVD drive. What I do need though is lots of disk space which is where this caddy wins big time. Take out your DVD drive, there is normally just one screw under the memory cover, unscrew the retaining clip from the existing DVD and put it on the caddy. Put a nice 1TB drive in the caddy, slide it back in, fasten it again with the screw and start your laptop. Windows should recognise your new drive and you can then do what you want. Personally I have relocated all the Documents, Downloads, Pictures to the new drive. You can search the net on how to do this.
I have now done this procedure to half a dozen laptop and for one, performance increases because your data files are on a different physical HD to your main system HD. Another advantage is that backing up is a lot easier and finally, should Windows go badly awry which it sometimes does, you can re-install or reset without losing your valuable data.
It's not difficult to do.
Hope this helps.

Jul 19, 2016
Adding 4 Sata Ports to your motherboard.
I have an ASUS Z170 Pro Gaming motherboard which is great with my i7-6700K except it only has 6 Sata slots, one of which is used by the DVD writer leaving only 5 for disks.
This was proving to be a bit of a nuisance as I wanted to use some spare SSD's that came out of another build.
The Syba 4 Port card was just the solution, adding another 4 slots. I put 3 old style HD's on the card, the DVD and 5 SSD's on the motherboard and now I am happy, with still one spare.
It conveniently fitted into an x1 PCI-e slot next to my GPU. I didn't have to install anything, Windows 10 was fine with it all.
I believe that the card supports RAID too but I haven't tried that as I don't think RAID is necessary in my case.
So if you have some spare HD/SSD's lying around and have run out of SATA slots on your motherboard this is a very cost effective way of utilising them.
Jun 29, 2016
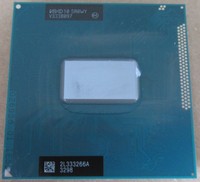
Installing an i5-3230M into a HP 250 G1
3 of 3 found this helpful My girlfriend as a HP 250 G1 and uses it a lot for work and general browsing etc. I had already upgraded the RAM to 8GB which is really quite easy, just a few screws on the underneath and done.
She kept moaning that her laptop was slow so I decided to have a look.
She had Microsoft Word open with 3 different documents, Excel, Powerpoint, Outlook, Internet Explorer with 15 tabs and Chrome with another 15 tabs.
No wonder it was slow !!!
Quickly downloaded the Service manual from HP and had a read.
This supports i5 processors I noticed. Quick look on Ebay and yay, found just what I needed. An i5-3230M, which I duly purchased.
The package arrived and I told Jessica that I would need her laptop for a few hours. I plugged in a Samsung 3TB portable drive and backed up her personal data...that took about 5 hours...320GB !!
In the meantime I read the service manual to make sure I got the sequence of part removal correct.
It's quite a job getting to the CPU on a laptop, even though I have done it before.
Stripped down, the new CPU went in, new thermal paste and rebuild.
Switch on and wonderful, worked 1st time. Did a few tests, checked temperatures and all good.
Hand it over to Jessica and she starts doing her stuff. Performance is ace.
Suddenly she shrieks, " It's stopped". I have a look and sure enough it had switched off.
Take it all apart, reseat everything, make sure all connectors are in place, rebuild and restart.
All looking good again, so I carry on doing this and that on it, monitoring things and suddenly it stops again.
I then do some searching on the internet regarding this and find in a forum, can't remember now which one, a similar case.
The motherboard used the Intel HM70 Express Chipset as the old CPU was Intel Pentium 2020M and that chipset is hard coded (apparently) that if it sees an i3 or i5 CPU it shuts down after 30 minutes.
For the i5 to work I needed HM75 chipset.
Now this was a blow so I put the old CPU back and rebuilt it all.
Undeterred I searched for a new mobo for the G1 and found one with an i3 and heatsink. I emailed the supplier and asked what price it would be for just the motherboard as I already had a CPU and heatsink.
They replied favourably and I duly purchased the motherboard.
When that arrived it was back to taking it all apart and rebuilding.
I can now do it all in about 15 minutes !!!
Jessica is pleased as punch as her laptop is really whizzy and says, " I can now put more rubbish on".
So for the total cost of £110 she now has a laptop that will keep her going for a few years, she does not do gaming.
The whole operation does require patience, a steady hand and small screwdrivers.
It is not an easy job but the results are stunning.
A great way to update a laptop without shelling out bundles.